Amazon

Thursday, September 15, 2011

Best Pendrives


Clash of the Pen Drives...

Alright here is the result of a lot of free time, and a lot of portable storage (used and unused) collected over a period of time. It came to precipitation when in one of my whims I bought a SanDisk Titanium 4GB USB flash drive, supposedly one of the fastest out there.

The Contenders


This image has been resized. Click this bar to view the full image. The original image is sized 1024x683.


The contenders, big and small I used for the tests were as follows:

From left to right: 
- SanDisk Cruzer Micro 2GB
- Kingston DataTraveler 4GB (old version)
- Kingston DataTraveler 2GB
- Sandisk Cruzer Titanium 4GB
- Kingston DataTraveler 4GB (new ) 


Additionally, not in the picture but included in the benchmarks were a Transcend JetFlash 4GB drive and my Philips GoGear 2GB mp3 player. The pendrive is to test, the player is in the mix just for fun!

All drives were formatted to FAT 32 and benched on the same rig, same port, with the same number of applications in the background.
Anyhow, I later found that formatting a drive or leaving data in it had no effect on the benches.


The Numbers


Read Speeds : The SanDisk duo are right on top!


Burst Speeds: The SanDisk drives are still on top, but the real surprise came from the Philips GoGear!


CPU utilization 


Random Access times:


Sorry for not putting up much text - the charts really took a lot of my time and attention!Let's let the pictures do the talking!

SanDisk does make good products, worth the extra money, but the CPU usage is also higher - a trade-off for greater performance.

As a side note:I installed Ubuntu 8.10 on the SanDisk in 37 mins or so, and the system booted up in 20 seconds flat! Compared to the previous installation on the Transcend 4GB that that used to take over 40 seconds to boot up and over 2 hours to install, that is a very significant improvement!

Conclusion


To summarize the test results, here is what I can say about them. 

SanDisk
 

Pros
- excellent build quality for both pen drives, good fit and finish.
- Faster transfer speeds, than peers

Cons
- Expensive (moderately)
- Higher CPU utilization

Kingston/Transcend

Pros
- Cheap
- Decent VFM performers
- Lower CPU utilization

Cons

- Build quality flimsy though Kingston is better than Transcend in this regard
- Transfer speeds can be really slow


So Choose according to which drive suits you best. - Cheers

Coolermaster 690 II Plus - Review


Coolermaster 690 II Plus - Review

Introduction

Cooler Master's current best seller, the CM 690 was initially launched in 2007 and has been one of their mainstays ever since then. The popularity of this chassis was such that it spawned a number of variants, amongst them a windowed version and later the 'Pure' version with an all black interior. The chassis was very simple in design and construction and what made it such a great product was that it was designed keeping a lot of the market requirements in mind.

With changing times and a lot of competition in the same price bracket, it was time for CM to look at a redesign of its current mainstay and that's exactly what they have done. They worked on the relevant additions required in today's market place and came back with the CM 690 II Advanced and the CM 690 II Plus. The Plus is an Asia Pacific specific model and is a little less customizable than the Advanced, but it still retains most of the practicality and all of the looks of its more expensive sibling. So without wasting anymore time, let's start by taking a look at the features of the CM 690 II Plus.
Available Color
Black

Material
Steel body / Plastic + Mesh bezel 

Dimension (W / H / D)
214.5 x 511.8 x 528.8 mm / 8.4 x 20.1 x 20.8 inch

Weight
Net Weight: 9.56 kg / 21.08 lbs
Gross Weight: 11.56 kg / 25.49 lbs

M/B Type
Micro - ATX / ATX / Mini-ITX(supports)

5.25" Drive Bay
4 (without the use of exposed 3.5”drive bay)

3.5" Drive Bay
6 Hidden
1 Exposed (converted from one 5.25” drive bay)

I/O Panel
USB 2.0 x 2 , eSATA x 1 , MIC x 1 , Audio x 1 (supports HD / AC97 audio)

Expansion Slots
7 + 1

Cooling System
Front: 140 x 25 mm Blue LED fan x 1 / 1200 RPM / 19 dBA
Rear: 120 mm fan x 1 / 1200 RPM / 17 dBA
Top: 120 x 25 mm fan x 1 / 1200 RPM / 19 dBA (supports 120 / 140 mm fan x 2)
Bottom: 120 mm fan x 2 (optional) 
Right side: 120 / 140 mm fan x 2 (optional)
Left side: 80 x 15 mm x 1 (optional)
HDD cage: 120 mm fan x 1 (optional)

Power Supply
Standard ATX PS2 / EPS 12V (optional)


Unboxing and AccessoriesThe chassis come packaged in a nice glossy white cardboard box. The front of the box has an image of what you can expect inside.


As you can see, the cabinet is a bit bigger than the old CM 690 and also has a slight change over the configuration of drive bays. Overall the extra room is a requirement of most modern mid to high end systems and CM has done the right thing by increasing the space available.

Let us see what all accessories are bundled with this product.


The Accessories

  • Product Manual.
  • Motherboard Installation Stand-Off Screws set.
  • Additional set of Black Screws for peripheral installation.
  • A set of 4 Plastic Thumb Pins for Side Fan Installation on Acrylic Window.
  • PC Speaker.
  • Lock Notch.
  • Black Cable-Ties.
  • 5 ¼ inches to 3 ½ inches drive bay convertor set.
  • PSU dust filter.
  • SSD Installation Adapter.
  • VGA Card Holder.

The Exteriors

The very first look at this chassis, made me wonder about the designers at Cooler Master, who have really worked hard to bring those small but very noticeable differences to a CM 690 which eventually brought CM 690 Advanced into existence. To start with, we have a much clearer side window then that of its predecessor or even the CM Storm Scout. Here the vertical lines of the side vent are confined to the fan installation area, giving you a clearer picture of what is installed inside this beautiful Chassis.


I
personally like the silver Streak going across the cabinet, from the front and to the top. Plus the small plastic groves at the front and top panel of the chassis, which gives an overall tough and rigid look to this product, or shall we say “The Military Style Looks”. Here Cooler Master has really maintained their craftsmanship and designed a flawless front and top panel. Another thing to notice in the CM 690 II series is that although it is clearly visible that the front and top panel are two different parts however has got a perfect fit. An issue that we noticed in the CM 690 was that at times the Front Panel did not fit in with the top panel and there used to be a noticeable gap at the median.

This time Cooler Master have shifted all the buttons and ports at the top panel of the chassis, making the front Bezel less prone to installation issues with no strings attached to it.


Looking at the top side of the chassis we see the reason behind the word ADVANCED added to the CM 690 II series, and it is the Hot Swappable HDD Bay which is a first of its kind feature added to the Cooler Masters range of Computer Chassis. The nice thing is that the Dock Space comes with a Slide-On Black Acrylic Cover for the times when the Dock is not in use.

Apart from that we now have an eSata port and an LED On/Off switch for the front LED fan, and as stated earlier, they are all mounted/incorporated in the top plastic section of the chassis, rather than the front bezel.


And a closer look at the HDD Dock with a HDD installed in that space. One more thing that we noticed was the angle of the slope at the dock space. It is perfectly crafted, so as to allow Easy-In Easy-Out access for the HDD.


Continuing, we see the similar Mesh Style at the top panel exhaust of the chassis and we see 3 embossed groves in the mesh metal top, going with the overall Tough theme of the chassis.


Moving ahead, the right side panel of the chassis is same as that of any other chassis of CM 690 series. It has a vent to incorporate an 80mm x 80mm x 15mm fan to cool of the CPU Socket are of the motherboard. This feature has been quite successful and we have seen a drop of 3-4 degrees near the CPU Socket area. With the introduction of STACK COOL II Technology from ASUS and Ultra Durable 3 Technology from Gigabyte, which are designed to evenly distribute heat through the area of the motherboard, this 80mm vent will come in handy.


Looking closely at the back side of the cabinet we found it identical to that of an HAF 922, with similar holes for water cooling and the concept of 7+1 expansion bay system. However there is certainly one major difference, the built quality. CM 690 II Advanced seems to have better built quality then I have seen in the Mid-Tower range of computer chassis from cooler master, in fact in comparison, the material used is the same as that of the CM Storm Sniper and with an overall black finish of the Chassis, it certainly stand against most of the Mid-Tower offerings in the market. Moving ahead we have the 120mm back exhaust with a 120mm fan included with the chassis.


One more thing to notice is that the expansion bay covers no longer have any ventilation system designed, this is a plus in keeping the dust away from the internal components of your RIG. Later we will talk about Dust Prevention System of CM 690 II Advanced, and unbelievably there is a lot to talk about. And, an industry standard, the PSU Housing is at the bottom of the chassis. Some detailed pictures.


If you remember, we had a VGA Card Holder in the accessories that came with CM 690 II Advanced. The two vertical grooves to the right of the 7 expansion bays are the mounting grooves for the VGA Card Holder.


Last but not the least, the bottom of the chassis. It is interesting to see the giant rubber feet of the chassis and right between them we have the inlet vent for the bottom mount PSU. At the right of it we have the bottom inlet designed specially to fit in 2 x 120mm fans or even a radiator of 2x120mm dimensions for all your water cooling need for a Crysis ready RIG. Good to see that we have a thin mesh plastic sheet for dust prevention at the 2x120mm vent.


In our next section, we talk about the interiors of the CM 690 II Advanced.


Interiors

The side panels are held in place with a pair of thumb screws. Once we take those of, we are greeted by the lovely black interior. I am sure that most of you will love it and I am happy that CM decided to paint even the basic model with a black interior. I for one would have saved a couple of days if they had offered the same interior on my CM Sniper.

The manual and accessories box is kept inside the chassis and the box is secured well enough to make sure it does not move while shipping. Once we remove these, we can admire the full beauty of this cabinet.


So let's start with some basic bservations about the interiors. The paint work is extremely durable and unless you try real hard, its a bit difficult to scratch. This is a well done machine finish with not a single blemish or bubble on it and CM have done a very good job of it.

Next, we have six HDD caddies, each with its own plastic retention bracket. I wish they had put in some more effort to dampen the HDD sound though. On the plus side, its a very easy to use and straight forward mechanism and much better than the ones on the previous 690.

The 5.25" bays have a new locking mechanism, which also works quite well. But if you do plan to move your system around, make sure to use the included screws to secure the other side as well.

Moving on, we see six cable management holes in the motherboard tray, as well as a large hole behind the CPU area. This is very well thought out and gives any person the chance to get the most wire free finish with minimal work. there are also a couple of areas where you can use zip ties to hold down those massive cables behind the motherboard tray. The bottom has three ventilation points, one of which will be used by the PSU. The second one can hold a 120 mm fan and the second and third together can be used for a 240 mm radiator if required. This should work extremely well with the new Swiftech MCR 220-Drive, since both the radiator and the pump can be fitted down here and then you only need tubes going to your CPU block. However this version does not have the removable HDD brackets, and so you would have to do a bit of work to get that done.

Looking at the top, this is where the 2 X 140 mm fans can be installed. 


The chassis comes with one 120mm fan as part of the package.


Continuing with the fans, we see the rear fan, which again is a plain-Jane 120 mm with no LED's and the front blue LED 120 mm fan. In the second picture, we can also see the cable management holes, and I wish CM had left a little more space between the motherboard tray and the rear panel to make it easier to hide the thicker cables.

Finally we take a closer look at the HDD caddies.


The one on the left will accommodate a normal 3.5" HDD and the one on the right would be helpful to those who have invested in an SSD. The positive of this system is how easy it is to work with, but I wish there was a little more rubber to keep HDD vibrations down.

Specification 

Features

  • Oversized front and top mesh design for superb ventilation
  • Accommodates 120 x 240 mm radiator inside the top or bottom
  • Dust-control filters for all meshed areas
  • Air cooling support for up to 10 fans (with support for up to 5 x 140mm fans)
  • External SATA X-dock
  • Front blue LED fan on/off switch
  • Rear retaining holes for water cooling kit
  • Includes 1.8" & 2.5" HDD and SSD adapter
  • Cable management and CPU retaining hole for easy maintenance
  • Includes VGA card bracket (supports triple GPU card)


Specification Sheet


Next, let us see how it holds a Dragon


Final Installation and Conclusion

I sat down to install a couple of components in this case and was presently surprised. Cable management is a breeze and I probably finished installing the below components in around 25 minutes, with minimal fuss.


Well the surprise here is the motherboard, but leaving that aside for another day and another review, you can probably make out how much those holes help in keeping things tidy. A nice sleeved PSU would probably enhance the overall looks a lot more. Everything went in without a fuss and as you can see we can easily install a 5870 or any of the new GTX series from Nvidia.

There is also a version with a side window which looks very much like the one on the Corsair 800D and I expect that will be available as well.


The reason for no CPU and ram in the final installation is that, that's a secret we are keeping for sometime later. To end this review, let's take a short look at the main pros and cons:


Pros


  • Great Cooling with ample space for Fan Installation
  • In Built HDD dock
  • 6 HDD installation Bays
  • Near Tool Free
  • Thumb Screws for Expansion Card Installation
  • Room for Cable management
  • VGA Card Holder
  • Plastic Thumb Pins for Side Panel Fan Installation
  • Flip Side Dual SSD mounting adapter
  • Absolute Quite Operation
  • Absolute Dust Free Environment
  • Very Easy Installation
  • Dual Radiator Support for water cooling
  • Rough Looks with Complete Black body & interiors
  • Great Built Quality
  • Price


Cons


  • Cannot install a HD5970
  • Small CPU Heat Sink replacement/installation hole
      • Very similar to the 690 Pure
      • Rear side panel should have had a bulge to help easier wire management
All in all, a great chassis but I would rather spend the extra Rs. 500 and get the advanced version. I expect the street price to be a bit lower than Rs. 5,000 once the initial hype ends.

The chassis will be available online as well as in shops around the 15th of this month.


Final Rating - 4.5/5

Basics of registry


INTRODUCTION


We all have a PC. We do tell ourselves often that “It’s our Computer”. In fact each windows system is what I can term as “Unique”. But there are exceptions for the term Unique. Exceptions are office systems where people work around only with some required applications and spreadsheets.


Windows Registry:
The one which holds all the personal settings of the user. So that is the place where you have to head towards if you wanna make computer your own.
How many customizations we shall expect from Windows Registry?
  • In XP, one can edit Registry to its heart content.
  • Second is the security restriction: Obviously you don’t want anyone to make a mess with your PC. 
  • Third is the Registry tool that we have now: That makes us feel like having the full control over the computer.
  • Fourth is the Performance: The major factor.
And finally, editing the existing Registry. It’s always fun to edit it.


In this article, we shall see the basic stuffs and sections that are available in Registry and the way we can make use of it. We will also come across various Registry terms.

Before getting into the article I would like to make a disclaimer here that “ Make all changes to the registry at your own risk. Handle all the powerful registry with caution and always make backup to the registry before attempting any changes.


Needs of Registry and its significance


Long time back, Registry was one of the least understood aspects of the windows family. Even a well versed professional used to approach the Registry with a degree of hesitation. They used to be very cautious when they work on Registry. Understanding the Registry is something equal to learning the heart of controlling and modifying our Windows system. If you understand deeply about the things in Windows, You can turn your system into a good performance machine with well enough customizations and you can very well personalize its appearance as well.

Ah!!! That’s something sweet. Customizing and personalizing is so cool. Aren’t it? Then Put yourself down in front of this article for some minutes, and know basic stuffs about Registry.


Use of Registry in Windows:
Registry is generally introduced and came to existence because of system INI files. INI files were a mess in the older version of windows. All the Configuration information of windows, application files and the hardware information were stored in those files. For an instance, an application is installed. When it’s launched, it needs information regarding the operating system and various other parameters. So, the application will access all the INI files to get their required information. Since these INI files are scattered almost everywhere, finding all of them during launch time becomes a mess by all the applications. 
In order to tackle this situation, all the application related information was stored in a common place. The common place is known as Windows Registry. All the installed applications will invoke the Registry for its required information. This in turn reduces the processing power of the CPU.

Now Registry has become the major tool for all the tweaks starting from customization to performance issues.


Registry – Hands On


Till now we have seen about the needs for Registry in windows and its basic functionality. Now it is time for a practical session. We were talking something about editing the Registry. How is that possible???

Yeah, Windows made an in-build application to perform all these things. Now lets see how shall we get into this application??


Here are the ways:
1. Just Click Start --> Run.

2. Now type Regedit.
There you go. Now you are in the Regedit application. 
Now what we should be aware of is, editing the Registry should be done with care. It’s strongly recommended that you backup the Registry immediately prior making changes. You must be also aware of how to restore the Registry in case the things go away. 

Now let us see about the structure and working of Registry.


You can see some sections at the right pane of the Regedit window. What sections those are?


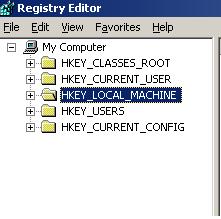
Let us discuss one by one:

HKEY_CLASSES_ROOT
Contains all the information related to the fundamental aspects of windows user interface, File association mapping, shortcuts and much other important stuff.

HKEY_CURRENT_USER: Contains all the information related to the current user logged into the system. This includes user’s desktop settings, logon names, and other user related information.
HKEY_LOCAL_MACHINE: Contains all the information related to hardware, Software and other stuffs that are common to all the users. 
HKEY_USERS:Contains all the information related to preferences of individual users.
HKEY_CURRENT_CONFIG: Contains all the information gathered when the computer boots up.


Value types in Registry


In the previous page we saw about the sections that Registry has. We might know that it has many sub keys, which in turn contain another sub key or values.


The Values are classified into three major types:
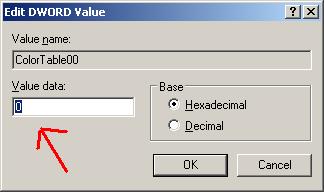
  • DWORD
  • Binary
  • String

DWORD
:
 
This Is usually a Boolean value. The value could be either 0 or 1. This Boolean value plays a vital role in toggling many features in Registry. 0 represents disabling the feature and 1 represents vice-versa.
BINARY: 
It represents a binary value which used to store a raw binary data and its mainly used for hardware components. 
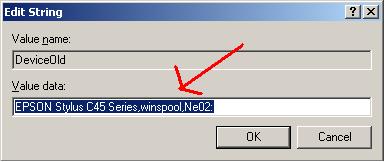
STRING
:
 
Its just a data type that represents a string value.


Editing the Registry


It’s time for us to get into the crucial part. This is where a lot of care is needed. 

How shall we edit the values?? 

Hope you remember that we have seen various types of values earlier in the article. Now all you have to do is follow the steps:
To add a key:
Right click the parent key which is similar to parent folder in the explorer. Then select New --> Key.Screenshot is shown below.


To add a key value:
Select the key under which you wanna add a value( Key value). Just right click the area under the Right pane. Select New --> Key type(your option)

To edit a key value:
Just double click the key value you want to edit

A Basic Guide To Graphics Cards


A Basic Guide To Graphics Cards
Graphics cards are gaining in importance. While gamers were always very clear about the benefits of a decent graphics card, other PC users innocently believed in what Intel told them. That they don't need anything other than the graphics chipset that was embedded in the motherboard.


But Vista changed it. It pushed people towards discrete graphics cards as some decent GFX horsepower was required to enable all the bling-bling that Microsoft put in its latest OS. After Vista came this thing called HD content. Playing HD content too requires some decent graphics power. Nowadays, we have some decent IGP solutions based on Nvidia's 9300 chipset or AMD's 780G chipset, but even they are sometimes not sufficient enough to pull off the HD content with ease.

And then of course, there is the need to game. An urge to kick some alien at a beautiful tropical island in all its glory. If you lust for the scenes like those in Crysis, owning a decently powerful graphics card almost becomes a necessity for you.

Once you are sure that you need a graphics card, comes the question - which one is suitable for you. And here I hope this basic guide will come handy to many visitors here, specially those who are looking to buy their first graphics card. (I will be dealing with PCI-E cards unless specified)

ELEPHONE P8mini, which is equipped with 4GB 64GB storage and 16MP front camera with facial features, start from $99.99.

ELEPHONE P8mini, which is equipped with 4GB 64GB storage and 16MP front camera with facial features, start from $99.99. : The cheapest 4GB 6...